
1. 概述
公司正好最近在整理项目的文档,且文档对于构建REST API来说是至关重要的。在这篇文章中,我将介绍Spring Doc , 一个基于OpenAPI 3规范简化了Spring Boot 1.x和2.x应用程序的API文档的生成和维护的工具。

2. 设置springdoc-openapi
如果想让 springdoc-openapi 为我们的API生成标准的 OpenAPI 3 文档, 只需要添加 [springdoc-openapi-core](https://search.maven.org/search?q=g:org.springdoc AND a:springdoc-openapi-core&core=gav) 依赖到 pom.xml:
<dependency>
    <groupid>org.springdoc</groupid>
    <artifactid>springdoc-openapi-core</artifactid>
    <version>1.1.45</version>
</dependency>
添加完成后,启动应用程序,即可访问默认路径 /v3/api-docs 查看文档,如下所示:
http://localhost:8080/v3/api-docs/如果想要自定义路径,可在 application.properties 文件中指定 :
springdoc.api-docs.path=/api-docs这样,文档的访问路径就变成 :
http://localhost:8080/api-docs/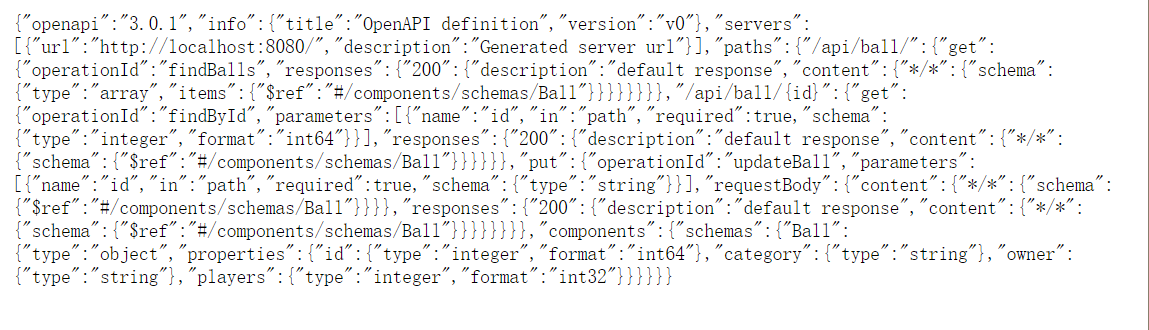
OpenAPI 默认定义为JSON 格式。对于 yaml 格式,可以访问下面的路径获取 :
http://localhost:8080/api-docs.yaml3.整合springdoc-openapi 和Swagger UI
除了自己生成OpenAPI 3规范外,我们还可以将springdoc-openapi与Swagger UI集成在一起,以便可以与我们的API规范进行交互并测试端点。
3.1. Maven 依赖
要整合springdoc-openapi 和 Swagger UI , 唯一要做的就是添加springdoc-openapi-ui依赖到项目pom.xml文件中。
<dependency>
    <groupid>org.springdoc</groupid>
    <artifactid>springdoc-openapi-ui</artifactid>
    <version>1.1.45</version>
</dependency>
访问swagger-ui页面:
http://localhost:8080/swagger-ui.html当然也可以像上面一样,自定义访问路径:
springdoc.swagger-ui.path=/swagger-ui-custom.html3.2. 举个栗子
假设有个球(国足令人伤心,所以需要个球啊!!)的controller。
@RestController
@RequestMapping("/api/ball")
public class BallController {

    @Autowired
    private BallRepository repository;

    @GetMapping("/{id}")
    public Ball findById(@PathVariable long id) {
        return repository.findById(id)
            .orElseThrow(() -> new BallNotFoundException());
    }

    @GetMapping("/")
    public Collection<book> findBooks() {
        return repository.getBooks();
    }

    @PutMapping("/{id}")
    @ResponseStatus(HttpStatus.OK)
    public Book updateBook(@PathVariable("id") final String id, @RequestBody final Book book) {
        return book;
    }
}
启动项目,在浏览器中访问地址:
http://localhost:8080/swagger-ui-custom.htmlswagger-ui的界面:
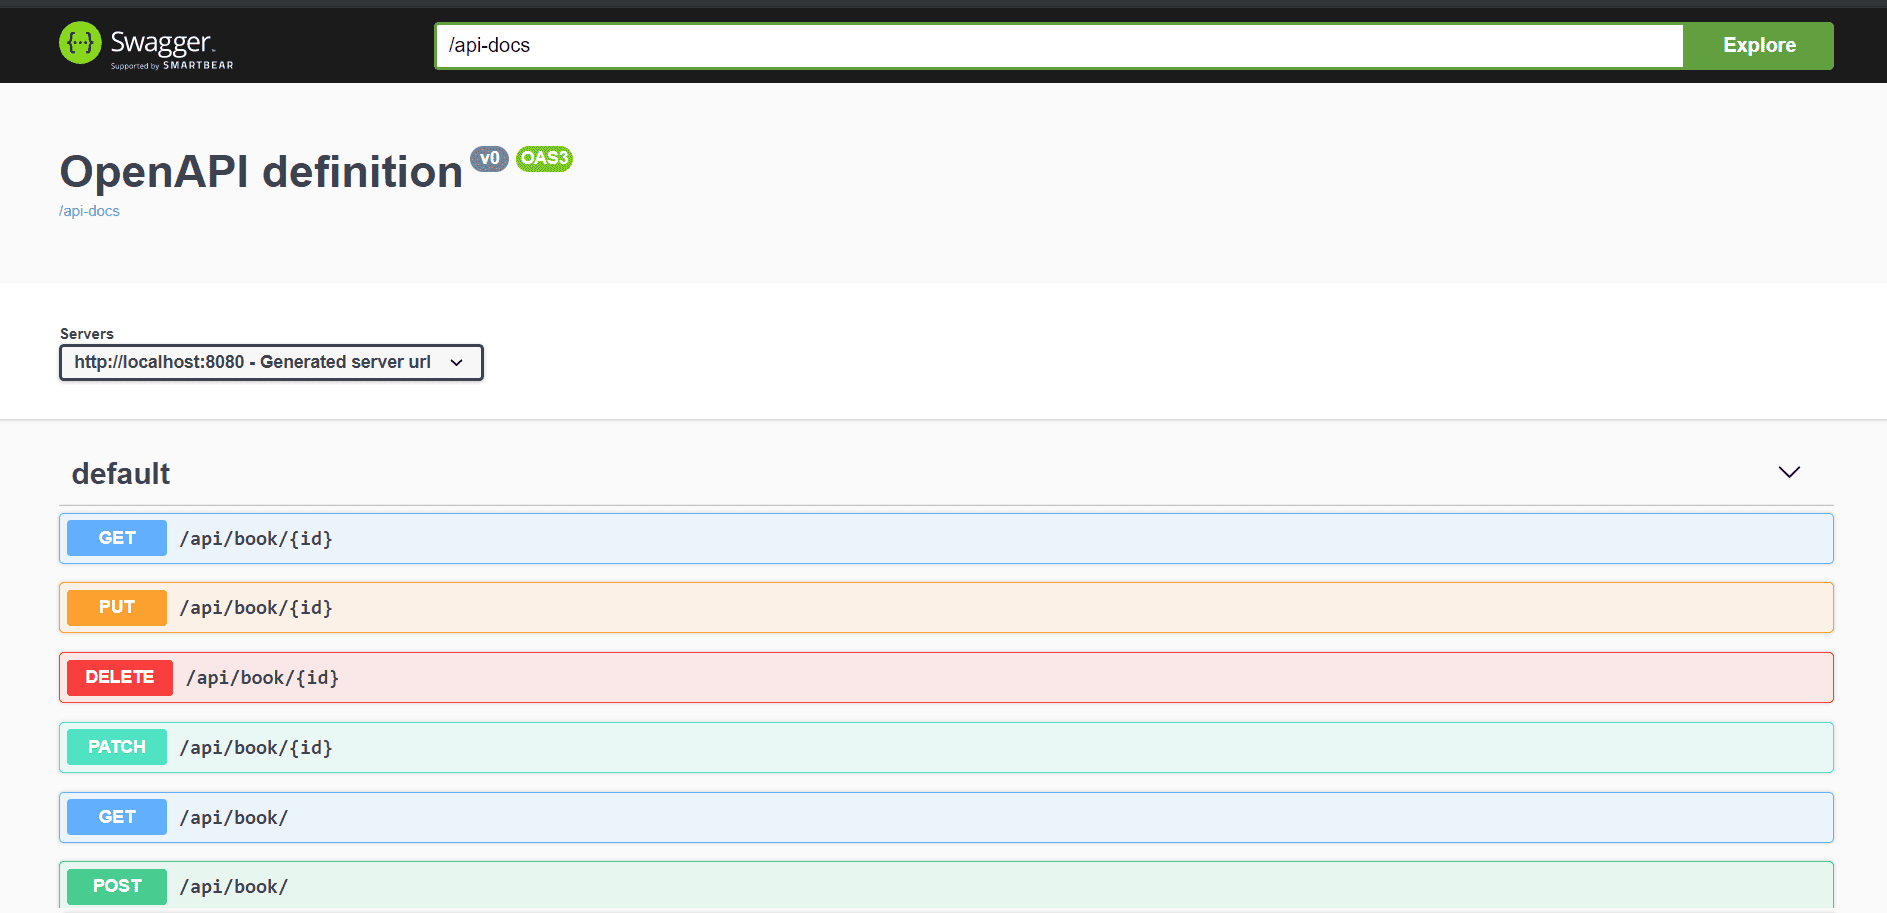
4. springdoc-openapi 与Spring WebFlux集成
我们可以在Spring WebFlux 项目中通过添加依赖:springdoc-openapi-webflux-ui与springdoc-openapi and Swagger UI 集成:
<dependency>
    <groupid>org.springdoc</groupid>
    <artifactid>springdoc-openapi-webflux-ui</artifactid>
    <version>1.1.45</version>
</dependency>
然后,浏览器访问地址
http://localhost:8080/swagger-ui.html同样的,可以通过添加 springdoc.swagger-ui.path 配置项到 application.properties文件来自定义文档访问路径。
5. 使用springdoc-openapi Maven 插件
springdoc-openapi 库提供了 springdoc-openapi-maven-plugin插件,用来生成JSON或者yaml格式的Open API 描述。
springdoc-openapi-maven-plugin 依赖于 spring-boot-maven 插件. Maven在集成测试阶段运行openapi插件。
那么,如何在pom.xml中配置插件呢?请看下面的代码:
<plugin>
    <groupid>org.springframework.boot</groupid>
    <artifactid>spring-boot-maven-plugin</artifactid>
    <version>2.1.8.RELEASE</version>
    <executions>
        <execution>
            <id>pre-integration-test</id>
            <goals>
                <goal>start</goal>
            </goals>
        </execution>
        <execution>
            <id>post-integration-test</id>
            <goals>
                <goal>stop</goal>
            </goals>
        </execution>
    </executions>
</plugin>
<plugin>
    <groupid>org.springdoc</groupid>
    <artifactid>springdoc-openapi-maven-plugin</artifactid>
    <version>0.2</version>
    <executions>
        <execution>
            <phase>integration-test</phase>
            <goals>
                <goal>generate</goal>
            </goals>
        </execution>
    </executions>
</plugin>
当然, 也可以用自定义值来配置插件:
<plugin>
    <executions>
        .........
    </executions>
    <configuration>
        <apidocsurl>http://localhost:8080/v3/api-docs</apidocsurl>
        <outputfilename>openapi.json</outputfilename>
        <outputdir>${project.build.directory}</outputdir>
    </configuration>
</plugin>
仔细看看我们在插件中配置的几个参数:
- apiDocsUrl – 访问json格式文档的URL, 默认路径:http://localhost:8080/v3/api-docs
- outputFileName – 存放定义的路径, 默认为: openapi.json
- outputDir – 文档存放的绝对路径–默认为: ${project.build.directory}
6. 使用 JSR-303 Bean Validation 自动生成文档
当我们在模型中使用 JSR-303 bean validation 注解, 诸如 @NotNull, @NotBlank, @Size, @Min, @Max等, springdoc-openapi 会为这些bean生成相应的约束。
举个栗子:
public class Ball {

    private long id;

    @NotBlank
    @Size(min = 0, max = 20)
    private String title;

    @NotBlank
    @Size(min = 0, max = 30)
    private String author;

}为Ball bean生成的文档内容更为丰富:
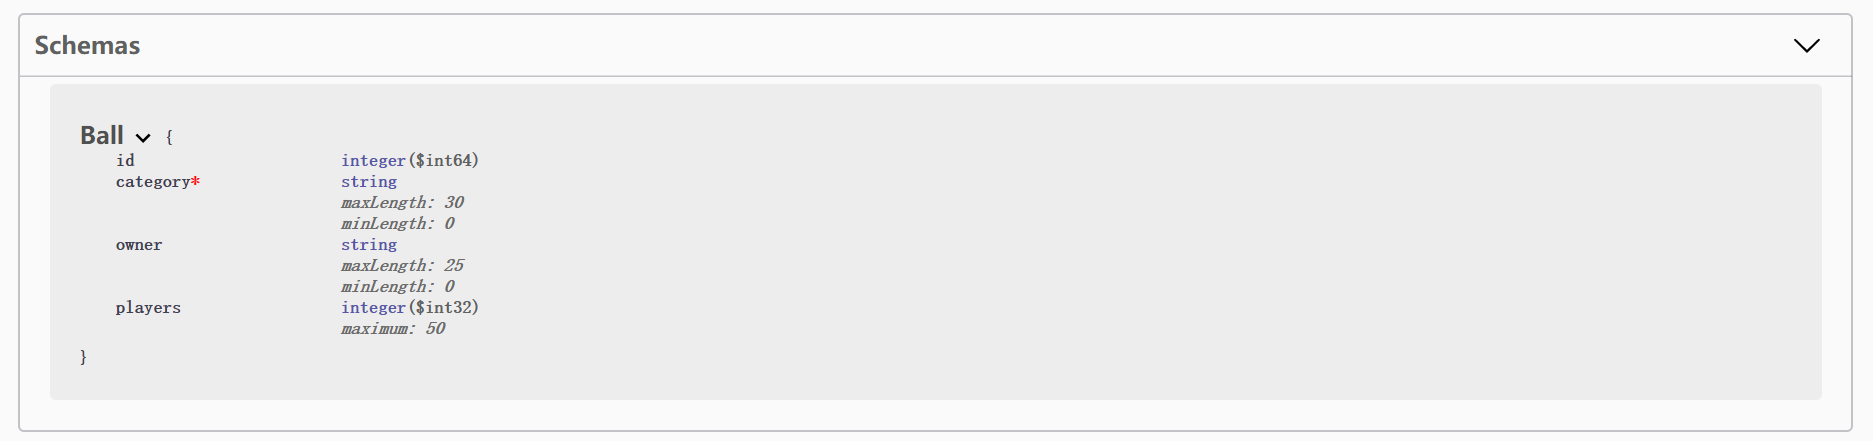
7. 使用 @ControllerAdvice和@ResponseStatus生成文档
在@RestControllerAdvice注解的类中,在方法上使用@ResponseStatus会自动生成带有返回状态码的文档。如以下被@ControllerAdvice注解的类中,@ResponseStatus修饰的两个方法:
@RestControllerAdvice
public class GlobalControllerExceptionHandler {
@ExceptionHandler(ConversionFailedException.class)
@ResponseStatus(HttpStatus.BAD_REQUEST)
public ResponseEntity<string> handleConnversion(RuntimeException ex) {
return new ResponseEntity<>(ex.getMessage(), HttpStatus.BAD_REQUEST);
}
@ExceptionHandler(BallNotFoundException.class)
@ResponseStatus(HttpStatus.NOT_FOUND)
public ResponseEntity<string> handleBallNotFound(RuntimeException ex) {
return new ResponseEntity<>(ex.getMessage(), HttpStatus.NOT_FOUND);
}
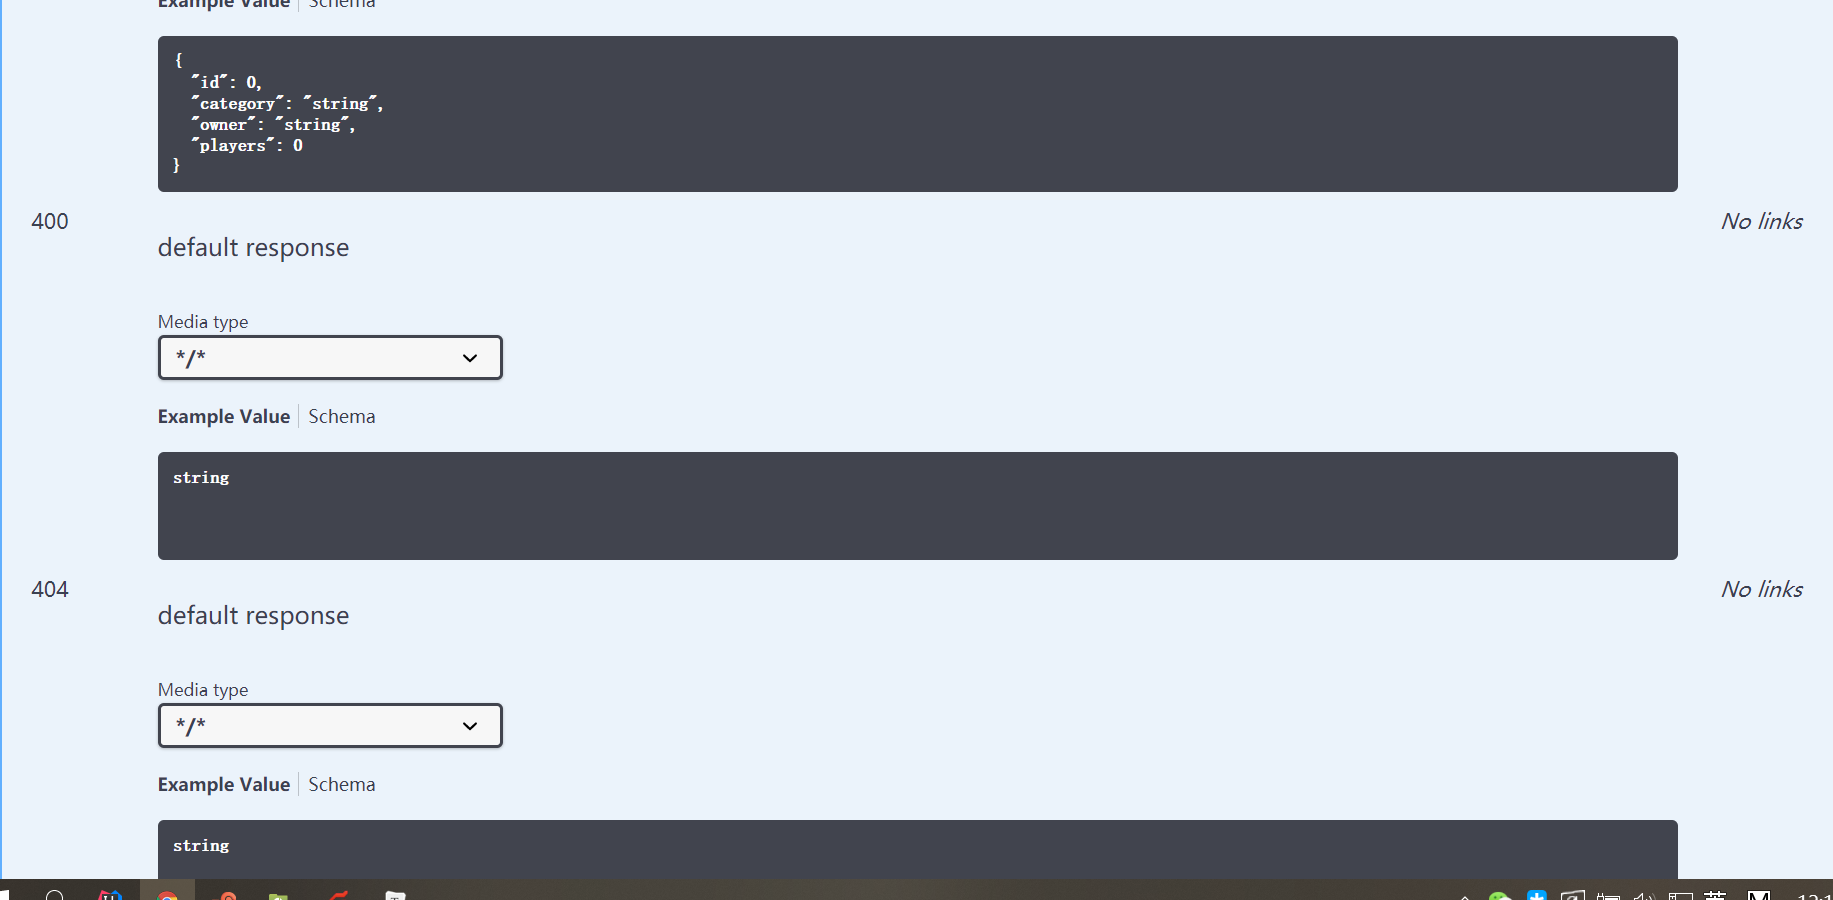
}现在我们可以在文档中看到返回状态码为400和404。
8. 小结
Spring Boot 2.2.x版本目前可能不支持,因此使用时最好使用2.1.x ,本文所使用Spring Boot版本 2.1.8.RELEASE。
以上代码可在我的github中找到, over on GitHub.